Maplet Help & User Guide
Your complete guide to saving, planning, and sharing locations with Maplet.
- Save unlimited locations with notes, photos, and voice memos
- Organize places into folders and categories for easy access
- Instantly see distances to your saved places and mark them as visited
- Open or share locations in any major map app (Apple Maps, Google Maps, Waze, HERE, and more)
- Plan journeys, optimize routes, and collaborate with friends (coming soon)
- Sync your data privately and securely across all your Apple devices with iCloud
- Import locations from CSV, GPX, or KML files, and export your data to PDF or CSV for backup, sharing, or use in other apps.
Home Screen (Map)
The Home screen is your main map view, where you can:
- See your current location (blue dot)
- Pan and zoom the map to explore
- Search for places
- Drop temporary or green (persistent) flags
- Save new locations
- Share locations
- Import from link
- Hide/show saved pins
- Hide/show flags
- Clear temporary flags
- Lock the save/share button to current location (for use in cars or on the move)

Key hints for the Maplet home screen interface
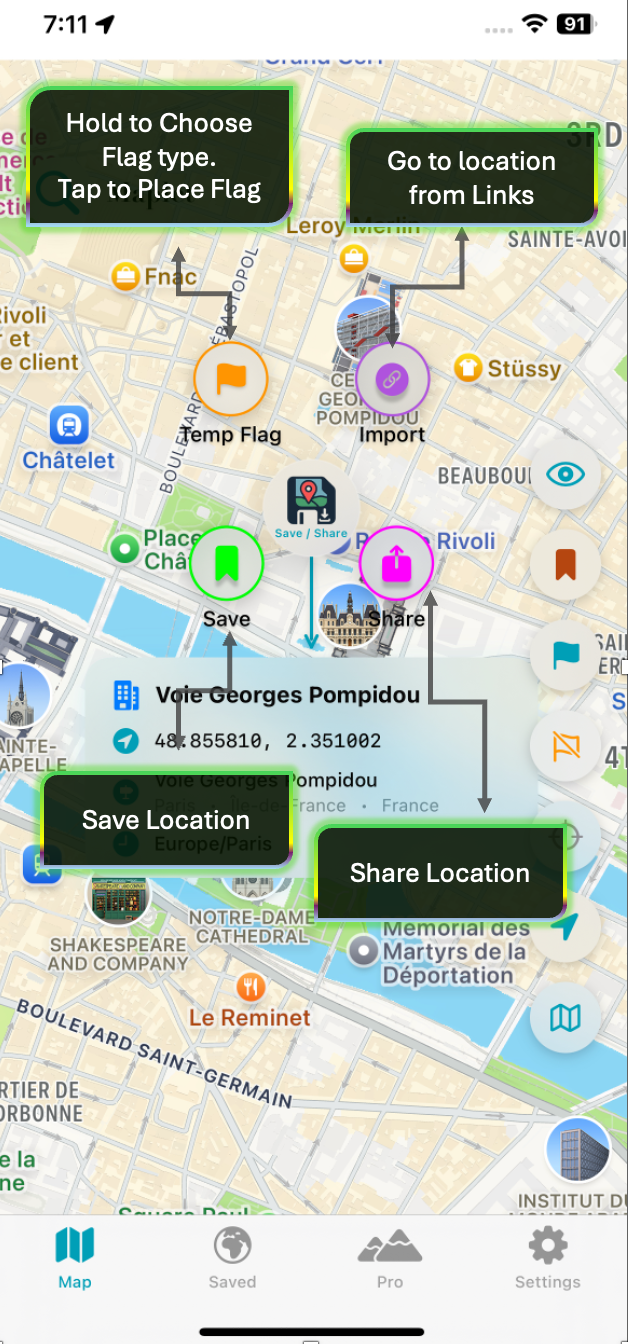
Save/Share Button's key hints for Maplet interface elements
Key Features:
- Center on User: Tap the location button to center the map on your current position.
- Search: Use the search bar to find addresses or places. Results appear in a dropdown.
- Drop Flags: Tap and hold the flag button to choose between dropping a temporary flag or a green flag (persistent). Temporary flags are cleared when the app is restarted or by pressing the clear flag button. Green flags are persistent, remain after restart, and can be used to later save the location. Green flags can be cleared through Settings (Clear Flags) or by clicking on an individual green flag to delete or save it.
- Save Button: Tap the floating save button to open the Save Location screen for the current map center.
- Map Style: Switch between standard and satellite map styles using the map style toggle.
Saving a Location
- Open the Save Sheet
- Tap the floating Save/Share button on the Home screen.
- Tap the Save button to open the Save Location sheet.
- The Save Location sheet will appear with details for the current map center.
- Fill in Details
- Title: Give your location a memorable name (required).
- Category: Choose a category (e.g., Food, View, Shopping, Other) or create your own.
- Folder: Organize locations into folders (e.g., Travel, Favorites).
- Notes: Add any extra details about the place.
- Rating: Optionally rate the location (1-5 stars).
- Photo: Attach a photo from your camera or library.
- Voice Note: Record a quick audio note about the location.
- Save
- Tap Save Location at the bottom. Your place is now saved!
Viewing Saved Locations
- List/Grid/Folders: Switch between list, grid, and folder views for your locations.
- Sort & Filter: Sort by distance, date, category, or visited status.
- Search: Quickly find a saved place by name or notes.
- Bulk Actions: Select multiple locations for batch actions (delete, move, etc.).
- Visited Flags: Mark locations as visited with a green checkered flag.
- Show Distance: Show current distance to locations in the list view.
Location Details:
- Tap any saved location to view its details, including:
- Title, address, notes
- Attached photos and voice notes
- Category and folder
- Date added and last modified
- Distance from your current location
Editing a Saved Location
- Open Edit Sheet
- From the Saved tab, tap a location, then tap the Edit button (usually a pencil icon).
- Edit Details
- Change the title, notes, category, folder, or rating.
- Add or update a photo or voice note.
- Delete an existing voice note if needed.
- Save Changes
- Tap Save Changes at the bottom to update the location.
Viewing Distance to Locations
- In the Saved tab, each location displays the distance from your current position.
- The distance updates on pressing refresh distance button.
- You can sort your saved locations by distance to quickly find the nearest places.
- When viewing a location's details, the distance is shown at the top or in the info section.
Sharing Folders and Locations
- Share a Folder:
- Long-press on a folder and select Share.
- Maplet will generate a special link for the folder.
- Privacy: The link is base64-encoded, generated completely offline, and contains only the folder's data. No information is sent to any server—sharing is fully private and secure.
- Limit: There is a 15 location limit when sharing via base64 offline link, as a tradeoff for privacy and offline capability.
- Shared Data: Only the title, address, coordinates, notes, and star rating are included. Photos and voice notes are not shared.
- Coming soon: Ability to share folders using other methods with more data types.
- How to Use:
- The recipient must have Maplet installed on their device.
- To import the folder, copy the link and paste it into Safari (or another browser) and open it. This will launch Maplet and prompt to import the folder.
- You can also share the link via email, AirDrop, or any messaging app.
- Share a Location or Open in Any Map App:
- Tap the share location button on a saved location card to generate a link or share in various map formats.
- You can open any location directly in your preferred map app: Apple Maps, Google Maps, Waze, HERE, Citymapper, Gaode, Yandex, 2GIS, or Maps.me.
- When sharing, you can choose to share the location in all supported map formats at once, making it easy for the recipient to open the location in their app of choice.
Managing Folders (Rename, Edit, Delete)
- In Folder view (Saved tab), long-press on any folder to open the options menu.
- Available actions:
- Rename: Change the folder's name.
- Edit: Update the folder's icon or color.
- Delete: Remove the folder (you may be prompted to move or delete its contents).
- Use these options to keep your folders organized and up to date.
Sharing Folders as .maplet Files
For complete folder sharing with all content, you can export folders as secure .maplet files.
Creates a secure .maplet file containing complete folder data. All locations, photos, and voice notes in one encrypted .maplet archive.
How to Share a Folder as .maplet File:
- Long-press on the folder you want to share
- Select Share Folder
- Choose Share as File from the options
- Type a custom name or leave the default name
- Press Generate .maplet File
- Choose to either share it normally or save it to Files
Features of .maplet Files:
- Complete folder data export. No limitations on location count
- Photos & voice notes included - All media is preserved
- SHA-256 integrity verification - Ensures file integrity
- Can only be opened by Maplet app - Secure and proprietary format
Perfect for folder backups, device transfers, or sharing full folder data securely.
Managing Shared Files
All shared .maplet files are stored within the app for easy access and management.
Accessing Export History:
- Go to Settings
- Under Export History, tap Export History
- View all previously shared .maplet files
Managing Shared Files:
- View: See all your previously exported .maplet files with creation dates
- Re-share: Tap any file to share it again via any available method
- Delete: Remove individual files you no longer need
Auto-Cleanup Options:
- Auto-delete after sharing: Enable this option to automatically remove .maplet files after they are shared
- Clear files older than 7 days: Use this option in Settings under Export History to remove all .maplet files older than 7 days
Note: These cleanup options help manage storage space and keep your export history organized.
Editing Categories in Settings
- Go to the Settings tab and select Manage Categories.
- Here you can:
- View all your custom categories.
- Tap the Edit button (pencil icon) next to a category to change its name, icon, or color.
- Tap the Delete button (trash icon) to remove a category (if not in use).
- Built-in categories cannot be edited or deleted.
 Journey Planner & Checklists (Pro)
Maplet’s Journey Planner lets you organize trips, create checklists of places to visit, and track your progress. Here’s how to use it:
Accessing the Journey Planner
- Tap the Journey Planner tab (or find it in the main menu).
- You’ll see a list of all your journey plans.
Creating a Journey Plan
- Tap the + button in the top right.
- Enter a title and optional notes for your journey.
- Add locations (stops) from your saved places.
- Organize stops into the order you want to visit them.
- Save your journey plan.
Viewing and Managing Journeys
- All your journeys are listed with progress, number of stops, and completion status.
- Use the search bar to find journeys by name or notes.
- Filter to show/hide completed journeys.
- Sort journeys by newest, oldest, A–Z, progress, or completion status.
- Tap a journey to open its checklist view.
Journey Checklist View
- See all stops in your journey as a checklist.
- Mark stops as completed as you visit them.
- View distance to each stop from your current location.
- Tap a stop to mark as visited or open more options.
- Long-press a stop for actions like editing notes, adding media, or opening in maps.
- Add quick notes, photos, or voice notes to each stop.
- Reorder stops manually (drag-and-drop) or use the Optimize button for the best route.
- Enable Live Tracking to highlight the nearest stop as you move.
- Track your overall journey progress with a progress bar.
Adding and Editing Journey Media
- Add journey-level notes, photos, and voice notes from the checklist view.
- Tap Edit in the Journey Media section to add or update media.
- Attach photos and voice notes to individual stops as well.
Exporting and Printing Journeys
- Tap the ... menu in the checklist view for options.
- Select Print Summary to generate a PDF of your journey, including all stops, notes, and media.
- Share or print the PDF directly from the app.
Completing or Deleting a Journey
- Mark a journey as complete from the ... menu.
- Delete a journey if you no longer need it (this cannot be undone).
 Multi-Route Planner (Pro)
The Multi-Route Planner is a powerful Pro feature that lets you plan and preview routes with multiple stops, optimize the order, and open or share the route in your favorite navigation apps.
Getting Started
- Open the Multi-Route Planner from the Pro tab or main menu.
- You’ll see a list/grid/folder view of all your saved locations.
Selecting Stops
- Tap locations to select them as stops for your route. Selected stops are highlighted and counted at the top.
- Use the search bar or folder view to quickly find and select locations.
- You can select as many stops as you like (minimum 2 required).
Using Current Location
- Choose to use your current location as the Start Point, End Point, or Off (not included) using the toggle at the top.
- This is useful for planning routes from where you are or to your current position.
Viewing and Managing Stops
- Switch between List, Grid, and Folder views to organize and select stops.
- Use the search bar to filter locations by name, notes, or folder.
- Long-press a location to view its details.
- Use the Clear All button to deselect all stops.
Distance and Sorting
- Tap the Show Distance button to display the distance from your current location to each stop.
- Sort your locations by newest, oldest, A–Z, or other criteria using the sort menu.
Previewing the Route
- Once you’ve selected at least 2 stops, tap Create Route.
- The Multi-Route Map View will open, showing your stops on the map and the calculated route.
- Use the Route Options section to:
- Choose Driving or Walking mode
- Enable Optimize Route & Stops to find the most efficient order
- View and reorder stops using the Stop List button
- Enable/disable individual stops
- The map displays all stops, the route polyline, and your current location.
- Use the Full Screen button for a larger map view.
Route Summary and Actions
- See the total distance and estimated time for your route.
- Switch between Open In and Share modes:
- Open In: Instantly open the route in Apple Maps, Google Maps, or Here WeGo
- Share: Generate a shareable link or message for your route in these apps
- Apple Maps is recommended for multi-stop routes, but you can use any supported app.
Advanced Features
- Stop List: Tap the list button to view, reorder, enable/disable, or optimize stops.
- Drag-and-drop: Reorder stops manually (when optimization is off).
- Optimization: Use the brain icon or toggle to automatically find the most efficient stop order.
- Transport Mode: Switch between driving and walking for different route calculations.
- Route Preview: See each stop’s number, title, and coordinates on the map.
- Error Handling: If a route can’t be calculated, you’ll see an error message with details.
 Importing Locations (Batch Import)
Maplet makes it easy to import multiple locations at once from CSV, GPX, or KML files. This is perfect for migrating data from other apps, sharing lists, or quickly adding many places.
Getting Started
- Open the Batch Import tool from the Pro tab or main menu.
- You’ll see options to select the file format (CSV, GPX, KML).
Step 1: Choose File Format
- CSV: For spreadsheets or exported lists (comma-separated values)
- GPX: For GPS tracks, waypoints, or routes (from GPS devices or mapping apps)
- KML: For Google Earth or other mapping tools (Keyhole Markup Language)
Step 2: Import Settings
- Target Folder: Choose or create a folder for imported locations.
- Default Category: Assign a category for locations that don’t specify one.
Step 3: Select and Import File
- Tap Choose File and select your CSV, GPX, or KML file from Files or iCloud.
- The app will parse the file and show a preview of the locations to be imported.
- Review the preview, including folder/category assignment and sample data.
- For large imports, you may be prompted to select a non-default folder.
Step 4: Preview and Confirm
- See a summary of the locations to be imported.
- For CSV, see which folders and categories will be used.
- For GPX/KML, see a list of points, types, and coordinates.
- If any locations are missing titles, you’ll be prompted to provide a base name.
Step 5: Handle Duplicates
- The app automatically checks for duplicates (within 10 meters).
- For each duplicate, choose to Skip or Merge & Update the existing location.
- You can apply your choice to all duplicates for faster importing.
Step 6: Import
- Tap Import to add all locations to your collection.
- You’ll see a summary of new, merged, and skipped locations.
Format-Specific Tips
- CSV Import: Required columns:
title(orname),latitude/lat,longitude/lon/lng. Optional columns:address,notes,category,folder,landmark,city,state,country,timezone. Supports both separate lat/lon columns and combinedcoordinatescolumn. - GPX Import: Supports waypoints, track points, and route points. Points without names will prompt for a base name (e.g., "Trail Spot 1"). Descriptions and comments are imported as notes.
- KML Import: Supports placemarks and points with valid coordinates. Points without names will prompt for a base name (e.g., "KML Point 1"). Descriptions and addresses are imported as notes.
Troubleshooting & Best Practices
- For best results, ensure your file is UTF-8 encoded and contains valid coordinates.
- If you see errors, check the format guide and sample files.
- For large imports, organize locations into folders for easier management.
- Use the preview to double-check data before importing.
- If you cancel or encounter errors, you can retry the import at any time.
 Exporting Locations (Pro Feature)
- Accessing the Export Feature
- Go to the Pro tab and select Export to PDF / CSV.
- You can also access Export from other Pro feature menus.
- Selecting Locations to Export
- The export screen shows all your saved locations, organized by folders and categories.
- Select the locations you want to export by tapping them. You can select multiple locations across folders.
- Use the search bar to quickly find locations.
- You can also sort and filter locations as needed.
- Configuring Export Options
- Tap Configure to open the Export Options sheet, where you can:
- Choose Export Format: PDF (for printing/sharing) or CSV (for spreadsheets or importing elsewhere).
- Include Map Links: Toggle to include direct links to each location in Apple Maps, Google Maps, or HERE Maps.
- Select Map Service: Choose which map app's links to include (Apple, Google, HERE).
- Choose Fields to Include: Select which details to export: title, photo, address, coordinates, notes, category, folder, date added, visited status, map link, and landmark name. Tap Reorder to change the order of fields in the export.
- Photo Options (PDF only): Toggle to include or exclude photos in the PDF export.
- Summary: See a summary of your export settings before proceeding.
- Previewing Your Export
- Tap Preview to see how your export will look.
- Switch between Formatted and Raw Data preview modes.
- Review the first few locations and fields to ensure everything looks right.
- Exporting and Sharing
- Tap Export to generate your file.
- Progress is shown as the file is created.
- Once complete, the share sheet will open, allowing you to save or share the file.
- Tips & Best Practices
- Only include the fields you need for a cleaner export.
- Including map links makes it easy for others to open locations in their preferred map app.
- Including photos in PDF exports is great for visual records, but may increase file size.
- CSV Exports: Ideal for data analysis, backup, or importing into other mapping tools.
- You can select all locations in a folder for batch export.
- Troubleshooting
- If you encounter any issues, try closing and restarting the app first.
- For persistent problems, check for app updates in the App Store.
- If you need further help, use the Support option in Settings to contact the developer or access help resources.
Maplet Pro Subscription
- Pro users get:
- Unlimited location saves (no 20-location limit)
- Access to all premium features: Smart Journey Planner, Multi-Stop Route Mapping, Custom Export (PDF/CSV), Batch Import (CSV/GPX/KML), and more
- Free users:
- Can use all basic features outside of Pro, but are limited to saving up to 30 locations
- Can organize, search, and share locations, but cannot access Pro-only features
- Subscription details:
- The one-year Pro subscription includes a 7-day free trial
- Cancel before the trial ends to avoid being charged
- Subscriptions auto-renew unless cancelled at least 24 hours before the end of the current period
- Manage or cancel your subscription at any time via your Apple ID settings
- By subscribing, you agree to the Terms of Service and Privacy Policy
Cloud Sync (iCloud)
- Maplet uses iCloud to automatically sync your locations, folders, and categories across all your Apple devices.
- No account setup needed: Just be signed into iCloud and have iCloud Drive enabled on your device
- Private and secure: Your data is only accessible to you via your Apple ID—no one else can see or access your locations
- Automatic sync: Changes you make (add, edit, delete) are synced seamlessly in the background
- Troubleshooting:
- If you notice data not syncing, check that you are signed into iCloud, have a stable internet connection, and iCloud Drive is enabled for Maplet
- Try restarting the app or your device if sync issues persist
- No manual export/import needed: All your data stays up to date across your iPhone and iPad automatically
Tips & Tricks
- Quick Save: Use the map center to quickly save your current view.
- Categories & Folders: Organize your places for easy access.
- Photos & Voice Notes: Add rich details to remember why a place matters.
- Visited Flags: Track places you've been to with a single tap.
- Search: Use the search bar in both Home and Saved tabs to find places fast.
- Long-Press Actions: Long-press folders for more options like sharing, renaming, and deleting.
- Edit Categories: Use Settings to keep your categories organized and visually distinct.
Frequently Asked Questions (FAQ)
Q: What happens if I reach the free location limit?
You won’t be able to save new locations until you delete some or upgrade to Pro for unlimited saves.
Q: How do I restore my Pro subscription?
Go to the Pro/Upgrade screen and tap “Restore Purchases.” Make sure you’re signed in with the same Apple ID you used to subscribe.
Q: Is my data private?
Yes! All your data is stored locally and synced via your private iCloud account. No data is sent to any external servers.
Q: How do I transfer my data to a new device?
Just sign in to iCloud on your new device and install Maplet. Your data will sync automatically.
Q: What if I accidentally delete a location or folder?
Deletions are permanent. There’s no undo, so please double-check before deleting. If you delete a folder and it still appears, restart the app.
Q: Why do I need to restart the app after deleting a folder?
Occasionally, deleted folders may still appear until the app is restarted. This is a known issue and will be improved in future updates.
Q: How do I contact support?
Mail to gemshi@me.com
Q: Can I use Maplet offline?
Yes! You can view, organize, and manage your saved locations offline. Some features (like map previews or sync) require internet.
Q: What map apps are supported for sharing/opening locations?
Apple Maps, Google Maps, Waze, HERE, Citymapper, Gaode, Yandex, 2GIS, and Maps.me.
Q: How do I cancel my subscription?
Open your device’s Settings, tap your Apple ID, go to Subscriptions, and select Maplet to manage or cancel your subscription.
Q: Can I share folders with others?
Yes! You can share folders in two ways: 1) As a base64 link (limited to 15 locations, no photos/voice notes) or 2) As a .maplet file (complete data including photos and voice notes, no location limits).
Q: What file formats does Maplet support for importing?
Maplet supports CSV, GPX, and KML files for importing locations. CSV is best for spreadsheets, GPX for GPS tracks, and KML for Google Earth files.
Q: What export formats are available?
Pro users can export to PDF (for printing/sharing with photos) or CSV (for data backup and use in other apps). Both formats can include map links and customizable fields.
Q: How do I share a .maplet file?
Long-press a folder, select "Share Folder," choose "Share as File," name it, and generate the .maplet file. You can then share it normally or save to Files.
Q: What's the difference between temporary and green flags?
Temporary flags are cleared when the app restarts or when you press the clear flag button. Green flags are persistent, remain after restart, and can be used to later save the location.
Q: How do I manage my shared .maplet files?
Go to Settings > Export History > Export History to view, re-share, or delete previously shared .maplet files. You can also set auto-delete options.
Q: Can I import locations from other map apps?
Yes! If the other app can export to CSV, GPX, or KML format, you can import those files into Maplet. Many popular mapping apps support these export formats.
Q: How do I organize my locations effectively?
Use folders for broad categories (e.g., "Travel," "Work," "Favorites") and categories for specific types (e.g., "Restaurants," "Hotels," "Attractions"). You can also use notes and ratings to add more detail.
Q: What happens to my data if I uninstall Maplet?
If you have iCloud sync enabled, your data will remain in iCloud and can be restored when you reinstall the app. If not, your data will be lost.
Q: Can I use Maplet without location permissions?
You can save locations manually by searching for addresses, but features like distance calculation, current location display, and automatic location saving require location permissions.
Q: How do I backup my data?
Your data is automatically backed up via iCloud sync. Pro users can also export their data to PDF or CSV files for additional backup.
Q: What's included in the Pro subscription?
Pro includes unlimited location saves, Shared Folders as .maplet files, Journey Planner & Checklists, Multi-Route Planner, Batch Import (CSV/GPX/KML), and Custom Export (PDF/CSV).
Q: How do I optimize my route in Multi-Route Planner?
After selecting your stops, tap the "Optimize Route & Stops" option to automatically find the most efficient order. You can also manually reorder stops by dragging them.
Q: What if my iCloud sync isn't working?
Check that you're signed into iCloud, have a stable internet connection, and iCloud Drive is enabled for Maplet. Try restarting the app or your device if issues persist.
Q: What if I see duplicate folders or categories?
If you notice multiple copies of the same folder or category, simply restart the app. Maplet will automatically detect and fix these duplicates during startup.
Feature Requests & Support
For any additional feature requests, bug reports, or anything else, please contact gemshi@me.com.